DARKBEACON GUIDE
Map keyboard input to gamepad controls
Set up gamepad controls, gradual throttle and steering for racing games, Key Travel Response, and controller testing.
Applies to: Flux keyboards (61, 68, 84, 87, and 100), Flux 68, Flux 84, and Flux 87 regional models, Devil Breaker and related keyboards
What you will accomplish
Choose one of the two gamepad mode (The supported controller type the device presents to the connected computer) types, Classic DirectInput or XBox Input, map a small set of keyboard controls, and confirm how your computer and the target application see them.
Applies to
Steps
- Close any application that could act on unintended controller input, connect by USB, and open Gamepad.
- Enable Gamepad Mode. Under Gamepad Type, choose Classic DirectInput when your game supports a classic controller, or XBox Input on Windows when your game expects an Xbox controller. If XBox Input is unavailable, read the explanation shown by DarkBeacon App and use Classic DirectInput with a compatible game.
- Map one direction and one button, keeping essential keyboard navigation available.
- Apply the preview. If DarkBeacon App shows Switching device mode, Waiting for the keyboard to reconnect, or Restoring keyboard settings, stop sending input, keep USB connected, and wait for the ready state before continuing.
- Open a controller test page for your computer, or the target application's input page. Verify neutral state, directions, buttons, and any trigger behavior.
- Add more mappings only after the first set is correct. Choose simultaneous keyboard output only when duplicate input is intended.
- If Movement Shaping appears, leave it at its reset state until the basic mapping, controller type, and neutral output are correct. Tune it separately afterward.
- Save to device (Store the current settings on the device so they remain after the App disconnects or power is restored), reconnect if requested, and confirm that the device card shows Classic gamepad mode or Xbox gamepad mode as intended. Repeat the neutral-state test.
Find the right setting
| Tab | What it changes or checks | Start here when |
|---|---|---|
| Key Selection | Which physical keys act as controller directions, axes, or buttons. | You need to assign or remove a control. |
| Key Travel Response | How much controller output a shallow or deep key press produces. | Walking, steering, or trigger pressure increases too quickly or too slowly. |
| Movement | The left-stick or X/Y movement shape, maximum output, and transitions over time. | Diagonals, movement limits, or changes of direction need tuning. |
| Gamepad Test | Input readings for Classic DirectInput; testing guidance for XBox Input. | You need to check the result before opening a game. |
The images below are offline interface examples using DarkBeacon App's controls. Example values and simulated readings illustrate the interface; they are not recommended settings or measurements from a connected keyboard. The available controls depend on your keyboard and firmware.
Key Selection
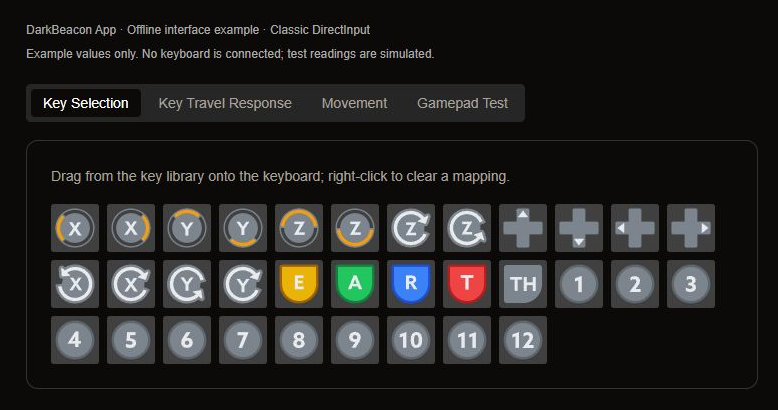
Open Key Selection and drag a control from the library onto a physical key in the keyboard view. Hover over an icon to read its name. Right-click the mapped key to clear its gamepad mapping. For the supported connected keyboards covered here, assigning the same controller function to a different key moves that function to the new key. Replacing a key's assignment replaces its previous gamepad control.
| Control family | What a press does |
|---|---|
| Classic DirectInput X/Y and Z/Rot Z directions | Produces variable directional output as the key moves. X/Y is the movement pair affected by Movement Shaping. |
| Classic DirectInput Rot X and Rot Y | Produces variable output on additional rotation axes. Bind the axes in a compatible game or simulator. |
| Classic DirectInput E, A, R, T, and TH | Provides separate variable controls for compatible simulation software. Their game actions depend on your in-game bindings. |
| Classic DirectInput numbered buttons and D-Pad | Sends on/off button or directional-pad input. These are not variable stick directions. |
| XBox Input left/right stick directions and LT/RT | Provides variable stick or trigger input. |
| XBox Input A/B/X/Y, LB/RB, Back/Start, L3/R3, and D-Pad | Sends on/off controller input. L3/R3 are stick-click buttons, not stick movement. |
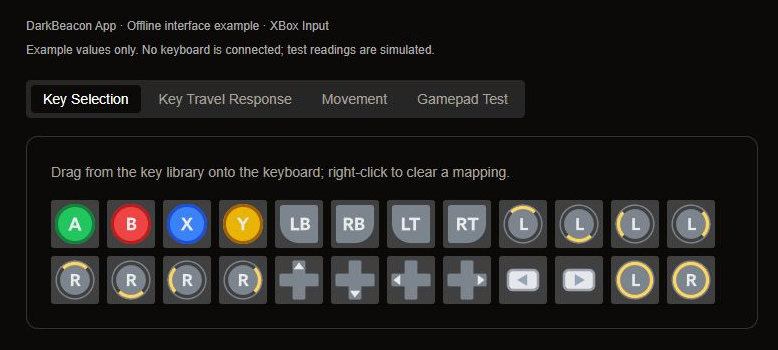
For an XBox Input movement example, assign L Up, L Left, L Down, and L Right to W, A, S, and D. Add one action button to a spare key. For Classic DirectInput, assign the X/Y directions, then verify which Y direction your game treats as forward. Press gently, then more deeply: a stick or trigger should vary, while a button should switch on and off. Changing the response curve does not turn a button into an analog control.
Release all keys after changing a mapping before testing the new assignment. Keep essential navigation available while you experiment.
Keyboard Output and Polling Rate
These settings are beside the tabs, under Gamepad Type.
| Keyboard Output | Result |
|---|---|
| Mute mapped keys only | Keys assigned to gamepad controls stop sending their ordinary keyboard input. Other keys continue working as keyboard keys. This is a useful starting point. |
| Gamepad and keyboard | Sends both controller and ordinary keyboard input. A game may react twice or keep switching its button prompts. |
| Gamepad only | Suppresses ordinary keyboard input while Gamepad Mode is enabled. Keep mouse access to the App so you can change this back. |
Polling Rate offers 250 Hz, 1000 Hz, and 8000 Hz. It controls how often controller input is reported. Start with 1000 Hz and lower it if the game or computer has compatibility problems. A higher rate does not change the times configured under Movement.
Stick Priority
Stick Priority decides what happens when two opposite directions on one stick axis are active together. Test with Movement's Smooth transitions off first so that the priority behavior is easy to see.
| Option | What to expect |
|---|---|
| Last Press Priority | The direction that becomes active later wins. Release it while holding the first direction and output returns to the first direction. |
| Neutral to Zero | Opposite output strengths subtract. Equal strengths cancel to center; unequal strengths leave the difference in the stronger direction. Holding both keys does not always mean zero. |
| Deepest Press Priority | The stronger press response wins instead of subtracting the weaker one. Compare clearly different press depths when testing. |
This setting governs stick directions. Do not assume it also changes how D-Pad buttons or triggers behave.
Key Travel Response
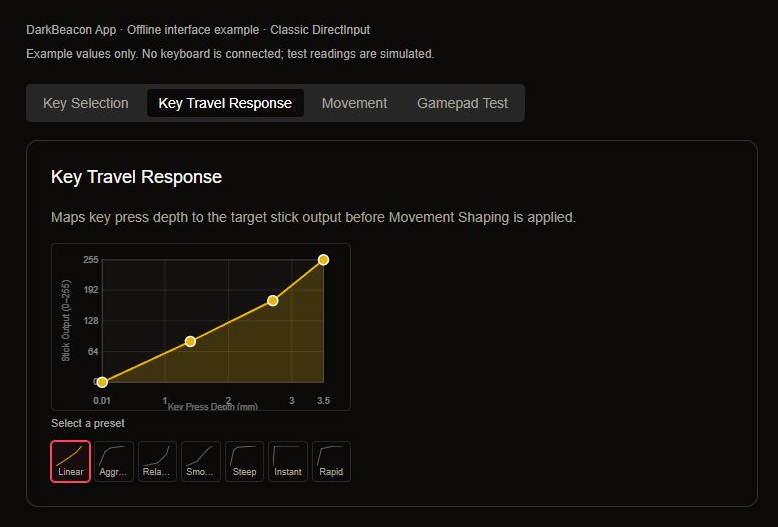
Open Key Travel Response. The horizontal axis, Key Press Depth (mm), is how far the key is pressed. The vertical axis, Stick Output (0–255), is the target strength: 0 is no output, about 128 is half strength, and 255 is full strength. The travel range follows the selected keyboard. The same response curve shapes variable stick, trigger, and compatible simulation-axis input; ordinary controller buttons remain on/off.
Start with Linear under Select a preset. Then drag one of the four points. Moving a point left makes that output occur earlier in the press; moving it upward gives more output at that depth. Hover over a point to inspect its values. Keep points progressing upward for a predictable first setup.
| Part of the curve | How to adjust it | What changes |
|---|---|---|
| First point's horizontal position | Move it right to increase Key Start Deadzone. | Light resting pressure below that depth produces no output. Too much deadzone delays intentional movement. |
| First point's height | Raise it to add Anti-Deadzone. | Output starts above zero once the starting depth is crossed. This can help cross a game's deadzone, but may make starting movement abrupt. |
| Two middle points | Raise or lower them in small steps. | Controls how gradually output grows through the press. Closely spaced points can create a sudden change. |
| Last point | Move a full-height point left to add Key End Deadzone. | Full output is reached before the bottom of the press. If the last point stays below 255, the end-of-press output stays below full strength. |
The deadzone regions are derived from the curve points; they are not separate controls to adjust elsewhere. Output remains zero at or before the starting depth, even if Anti-Deadzone is raised. Once the final point is reached, additional depth keeps that point's output.
| Preset | Typical response shown by the curve |
|---|---|
| Linear | A gradual starting reference for comparing changes. |
| Relaxed | Lower output through shallow and middle presses; more depth is needed for strong input. |
| Smooth | A gentler start that builds through the middle of the press. |
| Aggressive | Stronger output earlier in the press. |
| Steep | A sharp early rise toward high output. |
| Instant | Reaches full output very early, leaving little range for gentle control. |
| Rapid | A strong early rise followed by a smaller increase toward full output. This is a curve preset, not Rapid Trigger. |
Test a slow press, a half press, a full press, and a complete release after each change. Keep Movement at its reset baseline while comparing curves. Once the press response feels right, use Tune gamepad movement to adjust left-stick shape and timing. For example, a half-strength curve output combined with a 60% movement maximum gives a target of roughly 30% along that axis before other movement effects.
Racing games: gradual throttle, braking, and steering
On a supported keyboard, Gamepad Mode can turn press depth into variable stick or trigger input, including intermediate strengths around 50%. Simply changing the actuation point changes when an ordinary keyboard key activates; it does not make the game's W key into an analog accelerator. Assign a stick direction or trigger in Gamepad Mode, then use the game's controller bindings. D-Pad and ordinary controller buttons remain on/off.
Does the game need special keyboard support?
The game needs to recognize the selected controller type and accept analog input for the intended action. It does not need a DarkBeacon-specific integration when it already accepts those controller inputs. On Windows, use XBox Input for a game that supports an Xbox controller. Use Classic DirectInput only when the game supports that controller type and its axes; on macOS, XBox Input is unavailable.
Controller support alone does not guarantee every action is analog. Check that the game allows throttle, brake, and steering to use triggers or axes. A keyboard-only binding still behaves as a keyboard button. Some games also restrict mixing controller and keyboard/mouse input; check the game's input settings if controls or button prompts keep switching.
Example: W/S for pedals and A/D for steering
This example uses XBox Input on Windows over USB. Confirm that Gamepad Mode and this type are offered for your connected keyboard, then follow the setup steps above. In Key Selection, assign:
| Physical key | Controller control | Bind in the racing game |
|---|---|---|
| W | RT | Throttle / accelerate |
| S | LT | Brake |
| A | L Left | Steer left using the left stick's horizontal axis |
| D | L Right | Steer right using the same axis |
These are example assignments, not a preset installed automatically. Follow the game's binding controls; some games use one steering-axis binding for both directions. For Classic DirectInput, choose axes the game accepts and bind them explicitly rather than assuming this Xbox layout applies.
- Set Keyboard Output to Mute mapped keys only so the mapped keys do not also send ordinary W/A/S/D input. Other keys remain available for keyboard controls where the game permits them.
- Start with Linear in Key Travel Response. Keep Movement at its reset baseline while checking the basic response. An Instant curve leaves little room for gentle control. For A/D steering, try Neutral to Zero under Stick Priority: equal left/right output strengths cancel to center, while unequal strengths leave the difference toward the stronger side.
- Open the game's controller settings and select or bind the controls in the table. Check the displayed throttle, brake, and steering readings if the game provides them.
- Slowly press W, then S, from a light press to a deep press. Each should produce intermediate output instead of jumping immediately from none to full. Test A and D separately for gradual left and right steering. Release every key and check that the pedals return to zero and steering returns to center.
- Try holding a partial throttle and a small steering input together in a practice session. Adjust one response or in-game deadzone setting at a time, then repeat the release checks. Use Save to keyboard and confirm the result after reconnecting.
Does half a press mean exactly 0.5?
You can produce partial input, but half of the physical key travel does not necessarily equal exactly 50% output. Key Travel Response and its start/end deadzones determine the output at that depth. In-game deadzones, sensitivity, and response settings can change the result again; Movement settings also affect left-stick steering. In the App's curve, roughly 128 out of 255 represents half strength. Test the actual input reading instead of judging only by finger position or vehicle speed.
If the game still responds only on/off
- Check that the key is mapped to a stick direction or trigger, not a D-Pad direction or ordinary button.
- Check that the game uses the controller axis or trigger binding, not its keyboard binding. Confirm Mute mapped keys only is selected to avoid duplicate keyboard input.
- Check for an Instant or steep response curve, a raised Anti-Deadzone, or in-game settings that compress the usable range.
- Compare the controller test with the game. If the tester shows gradual input but the game does not, check controller-type support, bindings, and the game's analog-input settings. For XBox Input, use the game's input display or Windows controller settings; the App's built-in tester is unavailable for that type.
Gamepad Test
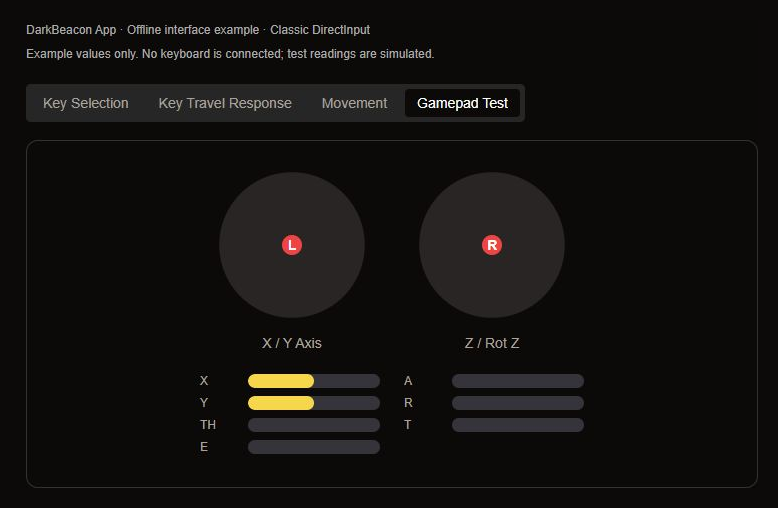
With Classic DirectInput, open Gamepad Test after the keyboard is ready. The X / Y Axis marker shows the movement pair. Z / Rot Z shows the other directional pair. The bars labeled X and Y below the markers represent rotation axes: halfway is their neutral position, not a stuck half press. A, R, TH, T, and E show the additional one-way controls; these should be empty at rest.
- Release every mapped key. Check centered markers and the appropriate neutral bar positions.
- Press each mapped direction separately, first lightly and then deeply. Confirm the intended direction and a gradual change in strength.
- Hold a diagonal. Check that Movement's gate and output limits behave as intended on the X/Y pair.
- Hold two opposite directions. Check the selected Stick Priority, then release them one at a time.
- Release everything. Output should immediately return to neutral, including when Deceleration is set above zero.
- Check numbered buttons and the D-Pad in the game's input settings or the operating system's controller tester. The App's Classic test panel does not display a complete numbered-button and D-Pad checklist.
The X/Y test outline can reflect the applied Circle or Square gate and its limits. Edited Movement values do not become applied values until Apply movement succeeds.
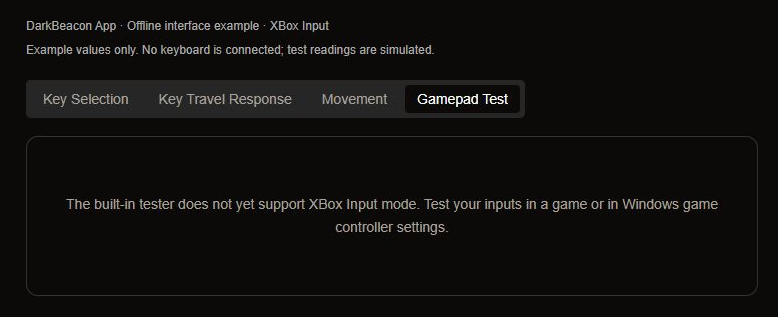
With XBox Input, the built-in test panel displays a notice instead of live input. Use the target game's controller settings or Windows game controller settings. Where available, open the detected controller's Properties, then its Test page. Verify sticks, triggers, buttons, and release behavior there. The App's notice alone does not indicate a keyboard fault.
If the Classic tester remains at Starting gamepad tester… or shows an error, wait for the keyboard to finish reconnecting and use Retry. If input works in the tester but not in the game, check the game's selected controller type, bindings, deadzones, and support for simultaneous keyboard/controller input before changing the keyboard again.
Confirm success
Your computer and the target application show the intended controller, controls return to neutral when released, and keyboard output follows the selected policy.
Save result
A Gamepad Type change replaces the previous controller connection while the keyboard reconnects. DarkBeacon App then restores and verifies the saved layout. Wait for that sequence to finish before judging save success. If a draft cannot sync, keep the draft and use Retry after the keyboard is ready instead of recreating the mapping.
Key Selection and Key Travel Response edits preview through the current profile when synchronization succeeds. Movement has its own Apply movement action. Use Save to keyboard at the top of the App to keep the final setup, then reconnect and repeat the input checks. Opening Gamepad Test does not save or change the mappings.
Limits and cautions
Recovery
Reconnect by USB, return to the previous Gamepad Type, clear the test mappings, and restore ordinary keyboard output. To turn the controller interface off without losing saved Gamepad and Movement settings, disable Gamepad Mode and allow the keyboard to restart. If DarkBeacon App says the mode switch is not complete, check the USB connection or return to the device list. Stop repeated mode changes and follow the device-not-found guide if it still cannot reconnect.