DARKBEACON GUIDE
Adjust keyboard lighting
Compare Preset Effects, Custom static lighting, and App-powered AI effects, then choose, adjust, and save the right option.
Applies to: Blade keyboards (61, 68, 84, 87, and 100), Flux keyboards (61, 68, 84, 87, and 100), Flux 68, Flux 84, and Flux 87 regional models, Devil Breaker and related keyboards, Steampunk, Other supported wireless keyboards shown in the App
What you will accomplish
Use DarkBeacon App to choose a lighting effect, adjust its visible controls, and verify comfort and retention. For an AI-created dynamic effect, use Adjust colors to add a color adjustment layer without asking the assistant to generate the animation again.
Applies to
Steps
Choose Preset Effects, Custom, or AI
The three tabs differ in both appearance and where the effect runs. A moving effect does not always need the App, and saving an effect does not always save it to the keyboard.
For onboard lighting, save to device (Store the current settings on the device so they remain after the App disconnects or power is restored) means keeping the supported settings on the keyboard, not just in the App.
| Tab | What you create or choose | Can it be saved to the keyboard? | Does DarkBeacon App need to keep running? |
|---|---|---|---|
| Preset Effects | Built-in lighting such as static, breathing, wave, rainbow, or key-reactive patterns. Available effects and controls vary by keyboard. | Yes, for the onboard effects and settings supported by the selected keyboard. Use Save to keyboard and wait for success. | No for saved onboard effects. The keyboard can run its built-in animation without the App. |
| Custom | A static color layout: choose colors for individual keys or groups, such as one color for WASD and another for the number row. It is not an animation editor. | Yes, on supported keyboards. Save the custom layout to the keyboard rather than leaving it only as an App preview. | No after a successful device save. The selected static layout can remain available without the App. |
| AI | AI-created dynamic or interactive lighting, with optional Adjust colors changes layered over the effect. | No. Saving the AI effect keeps it available in the App; it does not install the animation on the keyboard. | Yes. DarkBeacon App must remain running and the keyboard must stay connected. Running in the background in the system tray is sufficient; the main window does not need to stay visible. |
Choose Preset Effects for a ready-made pattern that can work without the App, Custom for your own fixed per-key colors, or AI for an App-powered animation. Even if Fill makes an AI effect look static, it remains an AI effect and still needs the App. For a standalone static layout, create it in Custom instead.
System tray is not Quit: minimizing or hiding the main window while DarkBeacon App remains running does not mean you have exited the App. AI lighting can continue in that background state. Choosing Quit, ending the App, shutting down or sleeping the computer, or disconnecting the keyboard prevents continued App-powered playback. Do not assume every close-button action keeps the App running; check its tray state. The lighting shown after AI playback stops depends on the keyboard and saved settings, so do not rely on a particular fallback effect.
Apply your chosen lighting
- Open the current device and select RGB Settings.
- For a built-in effect, open Preset Effects and choose an available option such as static, breathing, wave, rainbow, or key-reactive lighting.
- Set a comfortable brightness and speed, then adjust only the color, direction, or other controls shown for that effect.
- For a static custom layout, open Custom, choose Add Effect, select or drag across the target keys, and choose a color from the palette or visible value control. Repeat for other groups as needed; these colors do not animate over time.
- For AI lighting, open AI and play an existing effect, or use Generate with DB AI and wait for its preview. To change its colors directly, follow Adjust colors on an AI effect below.
- If Ember Trigger appears, preview it on harmless keys. It reacts to supported key travel and Rapid Trigger activity and requires the App to remain running while playing, including in the system tray.
- Preview in the room lighting where the keyboard will be used. Check legends, glare, flicker comfort, wireless battery impact, and whether an interactive effect stops cleanly.
- If applying a downloaded or AI-generated resource, use a copied profile and verify its model scope.
- When the result is comfortable, follow Save result. Saving an AI color adjustment and saving eligible settings to the keyboard are separate actions.
Adjust colors on an AI effect
The Effect layer supplies the moving pattern. The Color adjustment layer changes the colors of selected LEDs (the individual lights under keys or in light strips) while that pattern plays. It does not create a new animation, change key mappings, or switch keyboard function layers.
- In RGB Settings > AI, play the effect you want to recolor. Start with an effect you created and can edit.
- Click Adjust colors beside AI Effects, or Color adjustment layer beside the keyboard preview. Both open the same floating adjustment window.
- Drag the window by its title bar if it covers the keys you need. Scroll inside the window to reach parameters below the selection controls; the compare and save buttons stay at its bottom.
- Select a few keys, such as WASD, and check Selected LEDs before changing anything.
- Choose a Processing mode and adjust one parameter at a time. The result is previewed live; you do not need to save after every movement. If a preview is pending, let it finish before judging the result.
- Click Compare original to temporarily view the effect without your current color adjustments. Click it again to return to the adjusted preview.
- Use Save New for your first experiment if you want to keep the original effect separately. Use Save only when you intend to update the current effect.
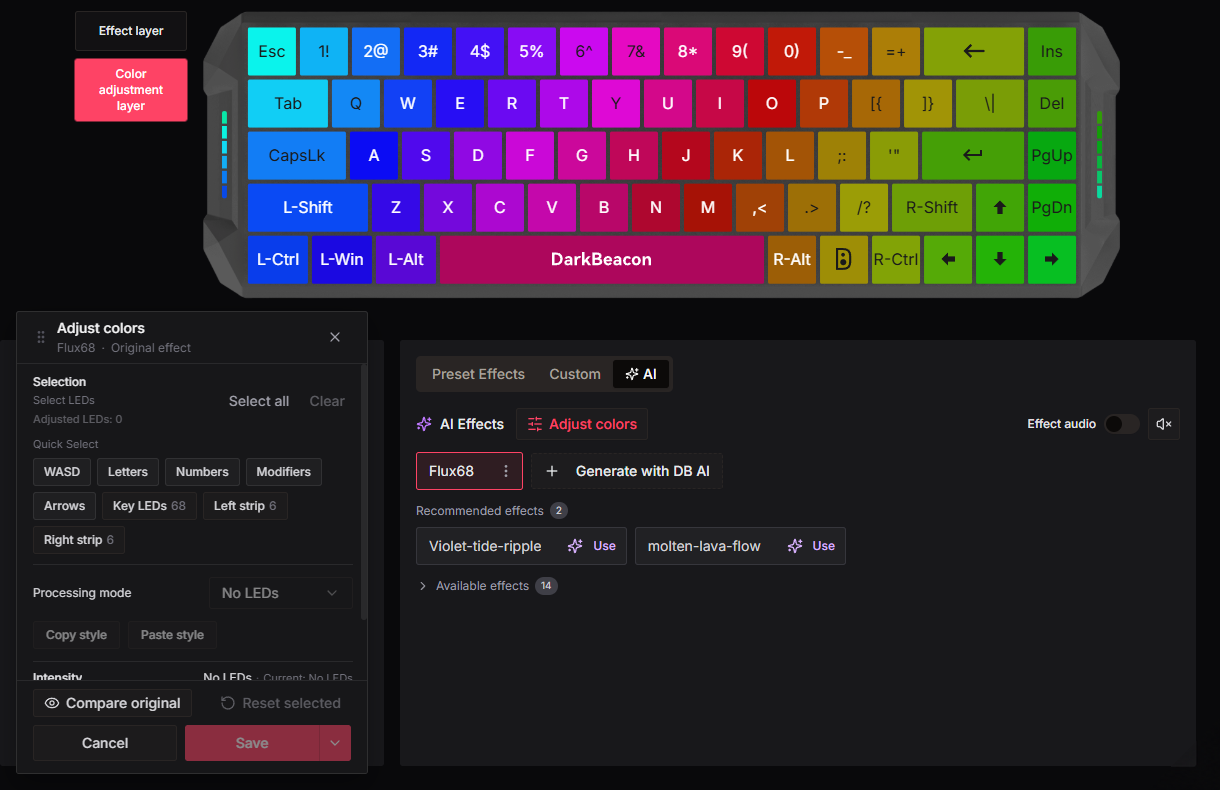
DarkBeacon App on Flux 68. The overview shows the floating Adjust colors window open with no lights selected yet; select lights to enable the adjustment controls. It is cropped from a supplied screenshot with the corner development badge removed; the detailed panels below use a separate example effect and have captured mouse pointers retouched out for clarity. Screenshots exclude chat and profile identifiers. They are not a before-and-after comparison or photographs of the physical LEDs.
Switching to Effect layer hides the adjustment window and its selection view; it does not undo the draft or turn off its preview. Return to Color adjustment layer to continue. Use Compare original for a temporary comparison, or Cancel to abandon unsaved edits.
Select exactly the lights you want
Click a key in the preview to add it to or remove it from the selection. Drag a selection rectangle to replace the selection with a group of keys. Quick Select offers groups such as WASD, Letters, Numbers, Modifiers, and Arrows where available.
Select all selects every available light, including supported accessory regions. To limit changes to keys, use Key LEDs when shown. Left strip, Right strip, and other region buttons select only that region; their availability and counts depend on the keyboard.
Clear clears the selection, not the adjustments. Adjusted LEDs counts lights with stored adjustment settings in the draft; click it to select those lights. It is not a count of how many keys happen to be illuminated in the current animation frame.
When a selection shows Mixed, its lights have different settings. Selecting them does not change those settings. Moving a slider sets that parameter to the displayed target for all selected lights; other parameters and unselected lights remain unchanged. Changing Processing mode replaces the selected lights' mode-specific settings with that mode's starting settings, so compare carefully before saving.
Adjust: tune the existing colors
Choose Adjust when you like the animation and want a different palette, stronger colors, or a lighter or darker appearance.
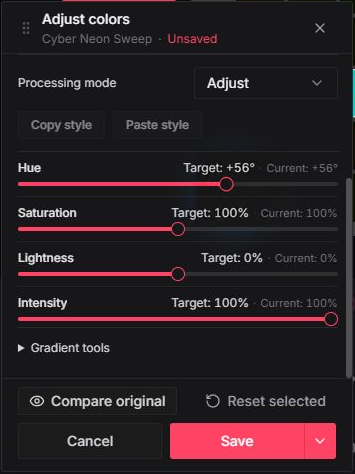
| Control | What it changes | How to start |
|---|---|---|
| Hue, -180° to +180° | Shifts the existing colors around the color range. It does not give every key one fixed color. | Start at 0° and move a small amount. Neutral gray does not become colorful from Hue alone. |
| Saturation, 0% to 200% | Changes how colorful the original palette appears. 100% preserves its saturation; 0% removes color. | Try a modest reduction for a softer look. High values cannot make every original color equally vivid. |
| Lightness, -100% to +100% | Makes the adjusted colors lighter or darker. Zero leaves their lightness unchanged. | Use small changes. Large positive changes can lift originally dark parts; extremes can flatten visible detail. |
| Intensity, 0% to 100% | Blends the adjusted result with the original effect. 0% shows the original; 100% applies the full adjustment. | Reduce it if the color change is too strong. It is not the keyboard's overall Brightness control. |
Target is the value being requested; Current is the accepted value, or Mixed if the selection differs. Wait for the live preview to settle before comparing. The screenshot's numbers are an example, not recommended settings for every effect.
Colorize: use one hue and keep the light-and-dark rhythm
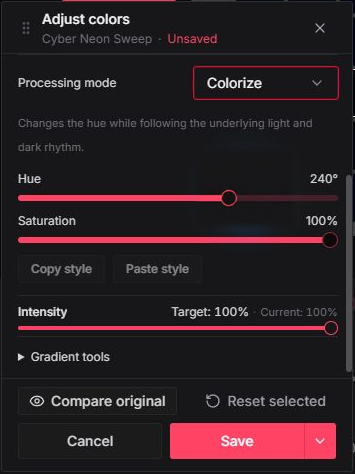
Choose Colorize to give selected lights a common hue while following the underlying effect's changing lightness. Adjust Hue from 0° to 359°, Saturation from 0% to 100%, and Intensity to control how strongly the recoloring is blended in.
For example, select WASD, choose Colorize, pick a hue you like, and watch a full animation cycle. Dark moments remain dark; fully black and fully white moments are not forced to the chosen color. This makes Colorize useful for recoloring a pulse or sweep without replacing its light-and-dark rhythm.
Fill: overlay a chosen color
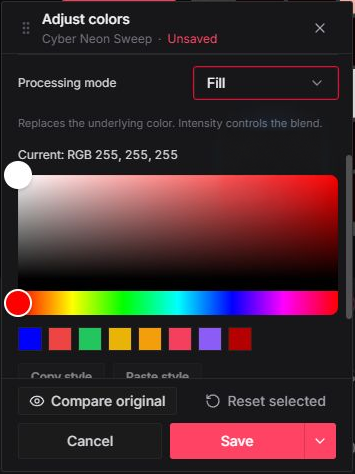
Choose Fill to apply a chosen color to selected lights. Use the color picker or a preset swatch; Current: RGB shows the accepted color. Then scroll down to Intensity to control the blend.
At 100% Intensity, Fill replaces the underlying color completely on the selected lights: they can look static even though the original animation still runs elsewhere. Below 100%, the original effect contributes to the result. At 0%, only the original effect is visible. Use Colorize instead if keeping dark gaps and pulses is your priority.
To reuse a style, select one light and click Copy style. Select the destination lights, then click Paste style. This copies the processing mode, its color settings, and Intensity; it does not copy a frozen frame of the animation.
Gradient tools: spread color or intensity across a selection
Gradients follow the lights' positions, not the order in which you clicked them. They affect only the selection. Choose lights spread across the direction you want to use.
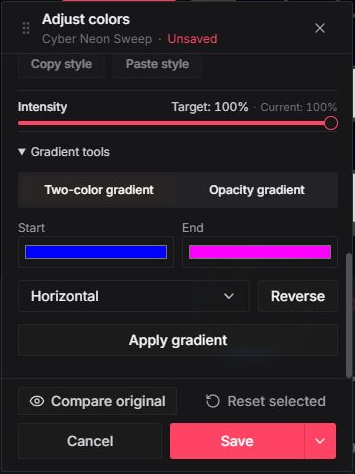
For a Two-color gradient:
- Select the target lights and set all of them to Fill.
- Expand Gradient tools, then choose Two-color gradient.
- Choose the Start and End colors.
- Choose Horizontal or Vertical. Use Reverse to swap the direction.
- Click Apply gradient. After this first application, changes to those gradient controls preview live for the same selection. Reapply after changing the selection, processing mode, or gradient tool.
- Reduce Intensity if you want more of the original animation to show through.
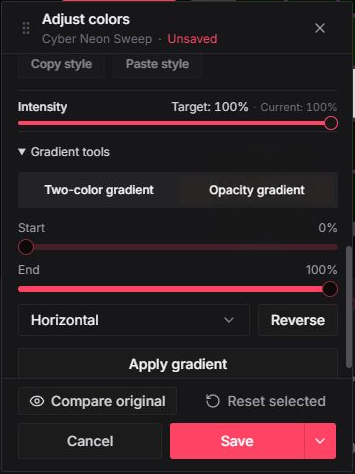
An Opacity gradient varies the adjustment's Intensity across the selected area without replacing each light's existing processing mode or color settings. For example, Start at 0% and End at 100% makes one end show the original effect and the other show the full adjustment. This is a spatial fade across lights, not a timed fade-in animation. Choose the endpoints and direction, then click Apply gradient.
If the App says the selected region cannot use gradients, use a supported selection or adjust its colors without a gradient. A selection occupying only one position along the chosen direction cannot show a spread from one end to the other.
Confirm success
The intended keys show the selected effect without distracting flicker. For saved Preset Effects or Custom lighting, exit the App and reconnect the keyboard to confirm the intended onboard effect remains available. For AI, keep the effect playing and hide the main window to the system tray; confirm playback continues while the App is still running. Do not use playback after fully quitting the App as the success test for AI lighting.
For AI color adjustments, watch a full animation cycle, compare the original, and check that unselected lights were not recolored. After saving, replay the effect from the AI list and confirm the adjustments return. Check the physical keyboard too: on-screen colors and perceived LED brightness can differ.
Save result
In the floating window, Save updates the current effect. The arrow beside Save opens Save New, which keeps the original separately and saves an adjusted effect. Wait for Effect saved, then confirm the saved effect is playing. If the App reports Saved, but not applied, select the saved effect from the AI list rather than recreating it.
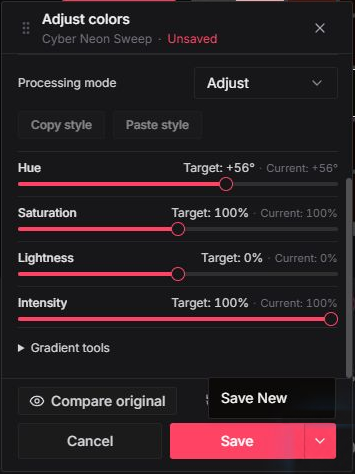
Unsaved means the current draft is not yet saved. Cancel, including the window's close button, abandons its unsaved edits. If switching effects or tabs presents a discard prompt, choose Keep editing to return or Discard and continue only when you no longer need the draft.
For supported Preset Effects and Custom static layouts, save to device (Store the current settings on the device so they remain after the App disconnects or power is restored) using Save to keyboard and wait for success. Keeping a layout in an App profile or seeing its preview is not by itself confirmation of a device save.
For AI, Save and Save New save the effect and its color adjustments for use in the App, not a standalone animation on the keyboard. Save to keyboard does not make an AI effect run without DarkBeacon App. AI effects, including Ember Trigger, require the App to keep running; its system-tray background state is sufficient. Saving a profile preserves eligible settings and references, not an active playback session. After restarting the App or reconnecting, select and play the saved AI effect if it does not resume.
Limits and cautions
High brightness and fast animation can reduce wireless runtime. A community effect can use capabilities that another model lacks.
Color adjustment availability depends on the effect and the App build. Play the effect first if prompted. Store-sourced effects or temporary previews may not allow editing. If sharing an adjusted effect is blocked by an availability message, keep the saved effect locally; saving does not guarantee that every Community or preview destination supports it.
Recovery
Select a static effect, lower brightness, or restore the profile's default lighting. If an interactive effect remains active, stop it in the App before reapplying the saved profile.
For color edits, use Compare original to check whether the adjustment caused the problem. Reset selected removes the selected lights' color adjustments from the current layer; it does not reset the keyboard or undo other lights' edits. Use Cancel to abandon this editing session instead of saving it.
If Read-only draft appears because the source effect changed, stop editing that draft. Discard and reload abandons it and loads the latest source. If controls show No LEDs, select keys or a supported light region. If you see no change, check the selection, Compare original, Intensity, and whether Enable adjustments is offered.